Machine Learning > AI EasyMaker > Console Guide
Dashboard
You can view the usage status of all AI EasyMaker resources in the dashboard.
Service Usage
Displays the number of resources in use per resource.
- Notebook: Number of notebooks in ACITIVE (HEALTHY) status that are in use.
- Training: Number of trainings that are COMPLETE
- Hyperparameter tuning: Number of hyperparameter tunings that are COMPLETE
- Endpoints: Number of endpoints in the ACTIVE state
Monitoring Services
- Displays the top 3 endpoints with the most API calls.
- Select an endpoint to see the aggregate API success/failure metrics for the child endpoint stage.
Resource Utilization
- You can see the most utilized resources by CPU and GPU core type.
- If you hover over a metric, it displays resource information.
Notebook
Create and manage Jupyter notebook with essential packages installed for machine learning development.
Create Notebook
Create a Jupyter notebook.
-
Image: Select OS image to be installed on the notebook instance.
- Core Type: CPU, GPU core type of the image is displayed.
- Framework: Installed framework is displayed on the image.
- TENSORFLOW: Image with deep learning TensorFlow framework installed.
- PYTORCH: Image with PyTorch deep learning framework installed.
- PYTHON: Deep learning framework is not installed and Images with only Python languages installed.
- Framework Version: Displays the version of the framework installed in the image.
- Python Version: Displays the installed Python version in the image.
-
Notebook Information
- Enter name and description of notebook.
- Select instance type for notebook. The specifications of instance is selected based on Instance type selected.
-
Storage
- Specifies size of notebook boot storage and data storage.
- Boot storage is the storage on which Jupiter notebooks and underlying virtual environments are installed. This storage is initialized when the notebook is restarted.
- Data storage is block storage mounted on the
/root/easymakerdirectory path. Data on this storage is retained even when the notebook is restarted.
- Storage size of created notebook cannot be changed, so please specify sufficient storage size at the time of creation.
- The storage size can be entered in the unit of 10GB, maximum 2,040GB.
- If necessary, you can associate NHN Cloud NAS to which connect your notebook.
- Mount Directory Name: Enter the name of the directory to mount on notebook.
- NHN Cloud NAS Path: Enter directory path in the format
nas://{NAS ID}:/{path}.
- Specifies size of notebook boot storage and data storage.
-
Additional Settings
- Tags: Allows to specify tags in Key-Value format. You can enter maximum 10 tags.
[Caution] When using NHN Cloud NAS Only NHN Cloud NAS created on the same project as AI EasyMaker is available to use.
[Note] Time to create notebooks Notebooks can take several minutes to create. Creation of the initial resources (notebooks, training, experiments, endpoint) takes additional few minutes to configure the service environment.
Notebook List
A list of notebooks are displayed. Select a notebook in the list to check details and make changes to it.
- Name: Notebook name is displayed. You can change the name by clicking Change on the details screen.
-
Status: Status of the notebook is displayed. Please refer to the table below for the main status.
Status Description CREATE REQUESTED Notebook creation is requested. CREATE IN PROGRESS Notebook instance is in the process of creation. ACTIVE (HEALTHY) Notebook application is in normal operation. ACTIVE (UNHEALTHY) Notebook application is not operating properly. If this condition persists after restarting the notebook, please contact customer service center. STOP IN PROGRESS Notebook stop in progress. STOPPED Notebook stopped. START IN PROGRESS Notebook start in progress DELETE IN PROGRESS Notebook delete in progress. CREATE FAILED Failed to crate notebook. If keep fails to create, please contact Customer service center. STOP FAILED Failed to stop notebook. Please try to stop again. START FAILED Failed to start notebook. Please try to start again. DELETE FAILED Failed to delete notebook. Please try to delete again. -
Action > Open Jupyter Notebook: Click Open Jupyter Notebook button to open the notebook in a new browser window. The notebook is only accessible to users who are logged in to the console.
-
Tag: Tag for notebook is displayed. You can change the tag by clicking Change.
-
Monitoring: On the Monitoring tab of the detail screen that appears when you select the notebook, you can see a list of monitored instances and a chart of basic metrics.
- The Monitoring tab is disabled when the notebook is being created or when there is a task in progress.
Configure User Virtual Execution Environment
AI EasyMaker notebook instance provides native Conda virtual environment with various libraries and kernels required for machine learning.
Default Conda virtual environment is initialized and driven when the laptop is stopped and started, but the virtual environment and external libraries that the user installs in any path are not automatically initialized and are not retained when the laptop is stopped and started.
To resolve this issue, you must create a virtual environment in directory path /root/easymaker/custom-conda-envs and install an external library in the created virtual environment.
AI EasyMaker notebook instance allows the virtual environment created in the /root/easymaker/custom-conda-envs directory path to initialize and drive when the notebook is stopped and started.
Please refer to the following guide to configure your virtual environment.
- On the console menu, go to Open Jupyter Notebook >Jupyter Notebook > Launcher>Terminal.
-
Go to
/root/easymaker/custom-conda-envspath.cd /root/easymaker/custom-conda-envs -
To create virtual environment called
easymaker_envin python 3.8 version, run the commandconda createas followsconda create --prefix ./easymaker_env python=3.8 -
Created virtual environment can be checked with
conda env listcommand.(base) root@nb-xxxxxx-0:~# conda env list # conda environments: # /opt/intel/oneapi/intelpython/latest /opt/intel/oneapi/intelpython/latest/envs/2022.2.1 base * /opt/miniconda3 easymaker_env /root/easymaker/custom-conda-envs/easymaker_env
Stop Notebook
Stop the running notebook or start the stopped notebook.
- Select the notebook want to start or stop from Notebook List.
- Click Start Notebook or Stop Notebook.
- Requested action cannot be cancelled. To proceed, please click Confirm
[Caution] How to retain your virtual environment and external libraries when starting the notebook after stopping it When stopping and starting the notebook, the virtual environment and external libraries that the user create can be initialized. In order to retain, configure your virtual environment by referring to User Virtual Execution Environment Configuration.
[Note] Time to start and stop notebooks It may take several minutes to start and stop notebooks.
Change Notebook Instance Flavor
Change the instance flavor of the created notebook. Instance flavor you want to change can only be changed to the same core type instance flavor as the existing instance.
- Select the notebook on which you want to change the instance flavor.
- If the notebook is running (ACTIVE), click Stop Notebook to stop the notebook.
- Click Change Instance Flavor.
- Select the instance flavor you want to change and click Confirm.
[Note] Time to change instance flavors It may take several minutes to change the instance flavor.
Delete Notebook
Delete the created notebook.
- Select notebook you want to delete from the list.
- Click Delete Notebook
- Requested deletion task cannot be cancelled. To proceed, please click Confirm
[Note] Storage When deleting a notebook, boot storage and data storage are to be deleted. Connected NHN Cloud NAS is not deleted and must be deleted individually from NHN Cloud NAS.
Experiment
Experiments are managed by grouping related trainings into experiments.
Create Experiment
- Click Create Experiment
- Enter an experiment name and description and click OK.
[Note] Experiment creation time Creating experiments can take several minutes. When creating the initial resources (laptops, trainings, labs, endpoints), it takes an extra few minutes to configure the service environment.
List of Experiments
Experiments appears. Select an experiment to view and modify detailed information.
-
Status: Experiment status appears. Please refer to the table below for main status.
Status Description CREATE REQUESTED Creating an experiment is requested. CREATE IN PROGRESS An experiment is being created. CREATE FAILED Failed to create an experiment. Please try again. ACTIVE The experiment is successfully created. -
Operation
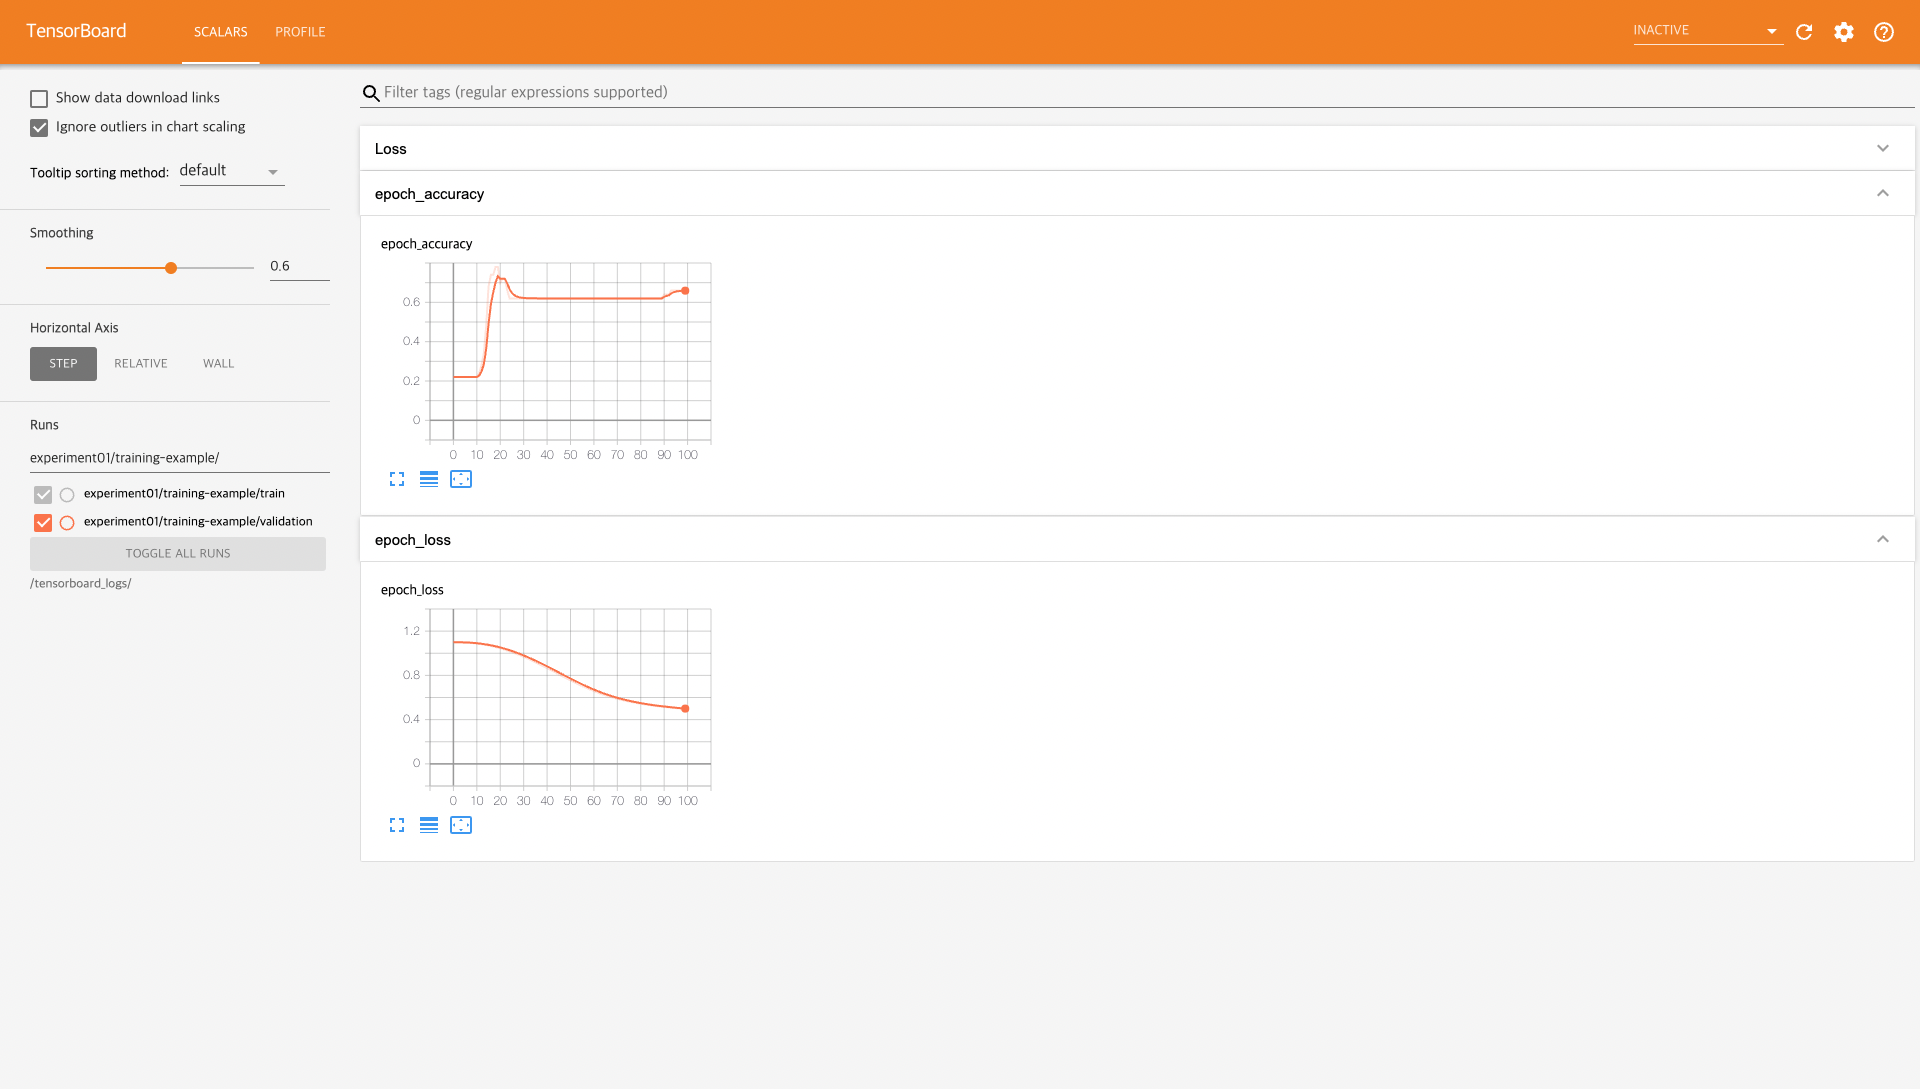
- Click Go to TensorBoard to open the TensorBoard in a new browser window, where you can view statistical information about the training included in your experiment. The TensorBoard is only accessible to users who are logged into the console.
- Retry: If the experiment status is FAIL, you can recover the experiment by clicking Retry.
- Training: The Training tab on the detailed screen that appears when selecting Training shows trainings included in the experiment.
Delete Experiment
Delete an experiment.
- Select an experiment to delete.
- Click Delete Experiment.
- Requested deletion cannot be undone. Click OK to proceed.
[Note] Unable to delete experiment if associated training exists. Experiment cannot be deleted if there is a training associated with the experiment. Please delete the associated training first, then delete the experiment. For related training, you can check the list by clicking the [Training] tab in the detail screen at the bottom that is displayed when you click the experiment you want to delete.
Training
Provides an training environment where you can learn and identify machine training algorithms based on training results.
Create Training
Set the training environment by selecting the instance and OS image to be trained, and proceed with training by entering the algorithm information and input/output data path to learn.
- Training template : To set training information by loading a training template, select 'Use' and then select a training template to load.
- Basic information : Select basic information about the training and the experiment that the training will be included in.
- Training Name : Enter a training name.
- Training Description : Enter a description.
- Experiment : Select an experiment to include training. Experiments group related trainings. If no experiments have been created, click Add to create one.
-
Algorithm information : Enter information about the algorithm you want to learn.
- Algorithm Type : Select the algorithm type.
- Algorithm provided by NHN Cloud : Use the algorithm provided by AI EasyMaker. For detailed information on the provided algorithm, refer to the Algorithm Guide document provided by NHN Cloud.
- Algorithm : Select an algorithm.
- Hyperparameter : Enter the hyperparameter value required for training. For detailed information on hyperparameters for each algorithm, refer to the Algorithm Guide document provided by NHN Cloud.
- Algorithm Metrics : Displays information about the metrics generated by the algorithm.
-
Own Algorithm : Uses an algorithm written by the user.
-
algorithm path
- NHN Cloud Object Storage : Enter the path of NHN Cloud Object Storage where algorithms are stored.
- obs://{Object Enter the directory path in the format Storage API endpoint}/{containerName}/{path}.
- When using NHN Cloud Object Storage, refer to Appendix > 1. Adding AI EasyMaker System Account Permissions to NHN Cloud Object Storage to set permissions. Model creation will fail if you do not set the necessary permissions.
- NHN Cloud NAS : Enter the NHN Cloud NAS path where the algorithm is stored.
nas://{NAS Enter the directory path in the format ID}:/{path}.
- NHN Cloud Object Storage : Enter the path of NHN Cloud Object Storage where algorithms are stored.
-
entry point
- The entry point is the point of entry into the execution of the algorithm from which training begins. Creates the entry point file name.
- The entry point file must exist in the algorithm path.
- Creating requirements.txt in the same path will install the required python packages from the script.
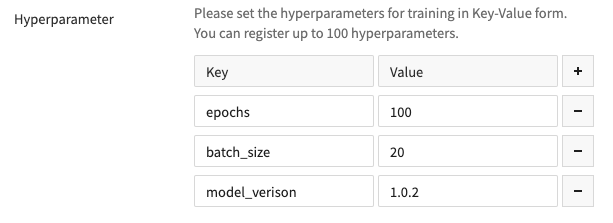
- hyperparameter
- To add parameters for training, click the + button to enter parameters in Key-Value format. Up to 100 parameters can be entered.
- The entered hyperparameters are entered as execution arguments when the entry point is executed. For detailed usage, please refer to Appendix > 3. Hyperparameters.
-
- Algorithm provided by NHN Cloud : Use the algorithm provided by AI EasyMaker. For detailed information on the provided algorithm, refer to the Algorithm Guide document provided by NHN Cloud.
- Algorithm Type : Select the algorithm type.
-
Image : Choose an image for your instance that matches the environment in which you need to run your training.
-
Training Resource Information
- Training instance type : Select an instance type to run training.
- Number of Distributed Nodes: Enter a number of distributed nodes to be performed. Distributed training can be enabled through settings in the algorithm code. For more information, please refer to Appendix > 6. Distributed Training Settings by Framework.
- Enable torchrun: Select whether to use torchrun, which is supported by the Pytorch framework. For more information, see Appendix > 8. How to use torchrun.
- Number of processes per node: If using torchrun, enter the number of processes per node. torchrun enables distributed training by running multiple processes on a single node. The number of processes affects memory usage.
-
Input Data
- Data Set: Enter the data set to run training on. You can set up to 10 data sets.
- Dataset name: Enter a name for your data set.
- Data Path: Enter the NHN Cloud Object Storage or NHN Cloud NAS path.
- Checkpoint : If you want to start training from a saved checkpoint, enter the save path of the checkpoint.
- Enter the NHN Cloud Object Storage or NHN Cloud NAS path.
- Data Set: Enter the data set to run training on. You can set up to 10 data sets.
- Output Data
- Output data : Enter the data storage path to save the training execution results.
- Enter the NHN Cloud Object Storage or NHN Cloud NAS path.
- Checkpoint : If the algorithm provides a checkpoint, enter the storage path of the checkpoint.
- Created checkpoints can be used to resume training from previous training.
- Enter the NHN Cloud Object Storage or NHN Cloud NAS path.
- Output data : Enter the data storage path to save the training execution results.
- Additional settings
- Data storage size : Enter the data storage size of the instance to run training.
- Used only when using NHN Cloud Object Storage. Please specify a size large enough to store all the data required for training.
- Maximum training time : Specifies the maximum waiting time until training is complete. training that exceeds the maximum waiting time will be terminated.
- Log Management : Logs generated during training can be stored in the NHN Cloud Log & Crash service.
- For more information, please refer to Appendix > 2. NHN Cloud Log & Crash Search Service User Guide and Log Check.
- Tag : To add a tag, click the + button and enter the tag in Key-Value format. You can enter up to 10 tags.
- Data storage size : Enter the data storage size of the instance to run training.
[Caution] When using NHN Cloud NAS, Only NHN Cloud NAS created in the same project as AI EasyMaker can be used.
[Caution] training failure when deleting training input data Training may fail if the input data is deleted before training is completed.
Training List
A list of studies is displayed. If you select a training from the list, you can check detailed information and change the information.
- Training time : Displays the training time.
-
Status : Shows the status of training. Please refer to the table below for the main status.
Status Description CREATE REQUESTED You have requested to create a training. CREATE IN PROGRESS This is a state in which resources necessary for training are being created. RUNNING Training is in progress. STOPPED Training is stopped at the user's request. COMPLETE Training has been completed normally. STOP IN PROGRESS Training is stopping. FAIL TRAIN This is a failed state during training. Detailed failure information can be checked through the Log & Crash Search log when log management is enabled. CREATE FAILED The training creation failed. If creation continues to fail, please contact customer service. FAIL TRAIN IN PROGRESS, COMPLETE IN PROGRESS The resources used for training are being cleaned up. -
Operation
- Go to TensorBoard : TensorBoard, where you can check the statistical information of training, opens in a new browser window.
For how to leave a TensorBoard log, refer to Appendix > 5. Store Indicator Logs for TensorBoard Usage. TensorBoard can only be accessed by users logged into the console. - Stop training : You can stop training in progress.
- Go to TensorBoard : TensorBoard, where you can check the statistical information of training, opens in a new browser window.
-
Hyperparameters : You can check the hyperparameter values set for training on the hyperparameter tab of the detailed screen displayed when selecting training.
-
Monitoring: When you select the endpoint stage, you can see a list of monitored instances and basic metrics charts in the Monitoring tab of the detailed screen that appears.
- The Monitoring tab is disabled while an endpoint stage is being created.
Copy Training
Create a new training with the same settings as an existing training.
- Select the training you want to copy.
- Click Copy Training.
- The create training screen is displayed with the same settings as the existing training.
- If there is any information you would like to change the settings for, make the changes and then click Create Training to create the training.
Create a Model from Training
Create a model with training in the completed state.
- Choose the training you want to create as a model.
- Click Generate Model Only training in the COMPLETE state can be created as a model.
- You will be taken to the model creation page. After checking the contents, click Create Model to create a model. For more information on model creation, see the model documentation.
Delete Training
Deletes a training.
- Select the training you want to delete.
- Click Delete Training. Training in progress can be deleted after stopping.
- Requested deletion cannot be undone. Click OK to proceed.
[Note] Training cannot be deleted if a related model exists. Training cannot be deleted if a model created by the training to be deleted exists. Please delete the model first and then the training.
Hyperparameter Tuning
Hyperparameter tuning is the process of optimizing hyperparameter values to maximize a model's predictive accuracy. If you don't use this feature, you'll have to manually tune the hyperparameters to find the optimal values while running many training jobs yourself.
Create Hyperparameter Tuning
How to configure a hyperparameter tuning job.
- Training Template
- Use : Select whether to use the training template. Using a training template, some configuration values for hyperparameter tuning are populated with pre-specified values.
- Training Template: Select a training template to use to automatically populate some configuration values for hyperparameter tuning.
- Basic Information
- Hyperparameter Tuning Name: Enter a name for the hyperparameter tuning job.
- Description: Input when a description of the hyperparameter tuning task is required.
- Experiment: Select an experiment to include hyperparameter tuning. Experiments group related hyperparameter tunings. If no experiments have been created, click Add to create one.-
- Tuning Strategy
- Strategy Name: Choose which strategy to use to find the optimal hyperparameters.
- Random State: Determines random number generation. Specify a fixed value for reproducible results. Algorithm information : Enter information about the algorithm you want to learn.
- Algorithm Type : Select the algorithm type.
- Algorithm provided by NHN Cloud : Use the algorithm provided by AI EasyMaker. For detailed information on the provided algorithm, refer to the Algorithm Guide document provided by NHN Cloud.
- Algorithm : Select an algorithm.
- Hyperparameter Spec : Enter the hyperparameter to use for hyperparameter tuning. For detailed information on hyperparameters for each algorithm, refer to the Algorithm Guide document provided by NHN Cloud.
- Name : Defines which hyperparameters to tune It is determined by algorithm.
- Type : Selects the data type of the hyperparameter. It is determined by algorithm.
- Value/Range
- Min: Defines the minimum value.
- Max: Defines the maximum value.
- Step: Determines the size of the hyperparameter value change when using the "Grid" tuning strategy.
- Algorithm Metrics : Displays information about the metrics generated by the algorithm.
- Own Algorithm: Uses an algorithm written by the user.
- Algorithm Path
- NHN Cloud Object Storage: Enter the path of NHN Cloud Object Storage where algorithms are stored.
- obs: Enter the directory path in the format of obs://{ObjectStorage API endpoint}/{containerName}/{path}.
- When using NHN Cloud Object Storage, please set permissions by referring to Appendix > 1. Adding AI EasyMaker system account permissions to NHN Cloud Object Storage.If you do not set the required permissions, model creation will fail.
- NHN Cloud NAS: Enter the NHN Cloud NAS path where the algorithm is stored.
nas://{NAS Enter the directory path in the format ID}:/{path}. - Entry Point
- The entry point is the point of entry into the execution of the algorithm from which training begins. Creates the entry point file name.
- The entry point file must exist in the algorithm path.
- Creating requirements.txt in the same path will install the required python packages from the script.
- Hyperparameter Specification
- Name : Defines which hyperparameters to tune.
- Type : Select the data type of the hyperparameter.
- Value/Range
- Min: Defines the minimum value.
- Max: Defines the maximum value.
- Step: Determines the size of the hyperparameter value change when using the "Grid" tuning strategy.
- Comma-Separated Values: Tune hyperparameters using static values (e.g. sgd, adam).
- Algorithm provided by NHN Cloud : Use the algorithm provided by AI EasyMaker. For detailed information on the provided algorithm, refer to the Algorithm Guide document provided by NHN Cloud.
- Image : Choose an image for your instance that matches the environment in which you need to run your training.
- Training Resource Information
- Training instance type : Select an instance type to run training.
- Number of Distributed Nodes: Enter a number of distributed nodes to be performed. Distributed training can be enabled through settings in the algorithm code. For more information, please refer to Appendix > 6. Distributed Training Settings by Framework.
- Number of Parallel Trainings: Enter a number of trainings to perform in parallel simultaneously.
- Enable torchrun: Select whether to use torchrun, which is supported by the Pytorch framework. For more information, see Appendix > 8. How to use torchrun.
- Number of processes per node: If using torchrun, enter the number of processes per node. torchrun enables distributed training by running multiple processes on a single node. The number of processes affects memory usage.
- Input Data
- Data Set: Enter the data set to run training on. You can set up to 10 data sets.
- Dataset name: Enter a name for your data set.
- Data Path: Enter the NHN Cloud Object Storage or NHN Cloud NAS path.
- Checkpoint: If you want to start training from a saved checkpoint, enter the save path of the checkpoint.
- Enter the NHN Cloud Object Storage or NHN Cloud NAS path.
- Data Set: Enter the data set to run training on. You can set up to 10 data sets.
- Output Data
- Output data : Enter the data storage path to save the training execution results.
- Enter the NHN Cloud Object Storage or NHN Cloud NAS path.
- Checkpoint : If the algorithm provides a checkpoint, enter the storage path of the checkpoint.
- Created checkpoints can be used to resume training from previous training.
- Enter the NHN Cloud Object Storage or NHN Cloud NAS path.
- Output data : Enter the data storage path to save the training execution results.
- Metrics
- Metric Name: Define which metric to collect from logs output by the training code.
- Metric Format: Enter a regular expression to use to collect metrics. The training algorithm should output metrics to match the regular expression.
- Target Indicator
- Metric Name: Choose which metric you want to optimize for.
- Goal Metric Type: Choose an optimization type.
- Goal Metric Goal: The tuning job will end when the goal metric reaches this value.
- Tuning Resource Configuration
- Maximum Number of Failed Trainings: Define the maximum number of failed lessons. When the number of failed trainings reaches this value, tuning ends in failure.
- Maximum Number of Trainings: Defines the maximum number of lessons. Tuning runs until the number of auto-run training reaches this value.
- Early Stop Training
- Name: Stop training early if the model is no longer good even though training continues.
- Min Trainings Required: Define how many trainings the target metric value will be taken from when calculating the median.
- Start Step: Set the training step from which to apply early stop.
- Additional settings
- Data storage size : Enter the data storage size of the instance to run training.
- Used only when using NHN Cloud Object Storage. Please specify a size large enough to store all the data required for training.
- Maximum Progress Time: Specifies the maximum progress time until training is completed. training that exceeds the maximum progress time will be terminated.
- Log Management : Logs generated during training can be stored in the NHN Cloud Log & Crash service.
- For more information, please refer to Appendix > 2. NHN Cloud Log & Crash Search Service User Guide and Log Check.
- Tag : To add a tag, click the + button and enter the tag in Key-Value format. You can enter up to 10 tags.
- Data storage size : Enter the data storage size of the instance to run training.
[Caution] When using NHN Cloud NAS Only NHN Cloud NAS created in the same project as AI EasyMaker can be used.
[Caution] Training failure when deleting training input data Training may fail if the input data is deleted before training is completed.
Hyperparameter Tuning List
A list of hyperparameter tunings is displayed. Select a hyperparameter tuning from the list to view details and change information.
- Time Spent : Shows the time spent tuning hyperparameters.
- Completed Training: Indicates the number of completed trainings among the automatically generated trainings by hyperparameter tuning.
- Training In Progress: Indicates the number of trainings in progress.
- Failed Training : Indicates the number of failed lessons.
- Best Training: Indicates the target metric information of the training that recorded the highest target metric value among the training automatically generated by hyperparameter tuning.
-
Status : Shows the status of hyperparameter tuning. Please refer to the table below for the main status.
Status Description CREATE REQUESTED Requested to create hyperparameter tuning. CREATE IN PROGRESS Resources required for hyperparameter tuning are being created. RUNNING Hyperparameter tuning is in progress. STOPPED Hyperparameter tuning is stopped at the user's request. COMPLETE Hyperparameter tuning has been successfully completed. STOP IN PROGRESS Hyperparameter tuning is stopping. FAIL HYPERPARAMETER TUNING A failed state during hyperparameter tuning in progress. Detailed failure information can be checked through the Log & Crash Search log when log management is enabled. CREATE FAILED Hyperparameter tuning generation failed. If creation continues to fail, please contact customer service. FAIL HYPERPARAMETER TUNING IN PROGRESS, COMPLETE IN PROGRESS, STOP IN PROGRESS Resources used for hyperparameter tuning are being cleaned up. -
Status Details: The bracketed content in the
COMPLETEstatus is the status details. See the table below for key details.Details Target Metric Value: Indicates the target metric value. GoalReached Details when training for hyperparameter tuning is complete by reaching the target value. MaxTrialsReached Details when hyperparameter tuning has reached the maximum number of training runs and is complete. SuggestionEndReached Details when the exploration algorithm in Hyperparameter Tuning has explored all hyperparameters. - Hyperparameter tuning generation failed. If creation continues to fail, please contact customer service. - FAIL HYPERPARAMETER TUNING IN PROGRESS, COMPLETE IN PROGRESS, STOP IN PROGRESS Resources used for hyperparameter tuning are being cleaned up. -
Operation
- Go to TensorBoard : TensorBoard, where you can check the statistical information of training, opens in a new browser window.
For instructions on how to leave TensorBoard logs, please refer to Appendix > 5. Store Indicator Logs for TensorBoard Usage. TensorBoard can only be accessed by users logged into the console. - Stop Hyperparameter Tuning : You can stop hyperparameter tuning in progress.
- Go to TensorBoard : TensorBoard, where you can check the statistical information of training, opens in a new browser window.
-
Monitoring: When you select hyperparameter tuning, you can check the list of monitored instances and basic indicator charts in the Monitoring tab of the detailed screen that appears.
- The Monitoring tab is disabled while hyperparameter tuning is being created.
List of Trainings for Hyperparameter Tuning
Displays a list of trainings auto-generated by hyperparameter tuning. Select a training from the list to check detailed information.
- Target Metric Value: Indicates the target metric value.
-
Status : Shows the status of the training automatically generated by hyperparameter tuning. Please refer to the table below for the main status.
Status Description CREATED Training has been created. RUNNING Training is in progress. SUCCEEDED Training has been completed normally. KILLED Training is stopped by the system. FAILED This is a failed state during training. Detailed failure information can be checked through the Log & Crash Search log when log management is enabled. METRICS_UNAVAILABLE This is a state where target metrics cannot be collected. EARLY_STOPPED Performance (goal metric) is not getting better while training is in progress, so it is in an early-stopped state.
Copy Hyperparameter Tuning
Create a new hyperparameter tuning with the same settings as the existing hyperparameter tuning.
- Select the hyperparameter tuning you want to copy.
- Click Copy Hyperparameter Tuning.
- The Create Hyperparameter Tuning screen is displayed with the same settings as the existing hyperparameter tuning.
- If there is any information you would like to change the settings for, make the changes and click Create Hyperparameter Tuning to create a hyperparameter tuning.
Create a Model from Hyperparameter Tuning
Create a model with the best training of hyperparameter tuning in the completed state.
- Choose the hyperparameter tuning you want to create as a model.
- Click Create Model. Only hyperparameter tuning in the COMPLETE state can be created as a model.
- You will be taken to the model creation page. After checking the contents, click Create Model to create a model. For more information on model creation, see the model documentation.
Delete Hyperparameter Tuning
Delete a hyperparameter tuning.
- Select the hyperparameter tuning you want to delete.
- Click Delete Hyperparameter Tuning. Hyperparameter tuning in progress can be stopped and then deleted.
- Requested deletion cannot be undone. Click OK to proceed.
[Note] Hyperparameter tuning cannot be deleted if the associated model exists. Hyperparameter tuning cannot be deleted if the model created by the hyperparameter tuning you want to delete exists. Please delete the model first, then the hyperparameter tuning.
Training Template
By creating a training template in advance, you can import the values entered into the template when creating training or hyperparameter tuning.
Create Training Template
For information on what you can set in your training template, see Creating a training.
List of Training Templates
Displays a list of training templates. Select a training template from the list to view details and change information.
- Operation
- Change : You can change training template information.
- Hyperparameters : You can check the names of hyperparameters set in the training template on the Hyperparameters tab of the detailed screen displayed when you select a training template.
Copy Training Template
Create a new training template with the same settings as an existing training template.
- Select the training template you want to copy.
- Click Copy Training Template.
- The Create training Template screen appears with the same settings as the existing training template.
- If there is any information you would like to change the settings for, change it and then click Create Training Template to create a training template.
Delete Training Template
Delete the training template.
- Select the training template you want to delete.
- Click Delete Training Template
- Requested deletion cannot be undone. Click OK to proceed.
Model
Can manage models of AI EasyMaker's training outcomes or external models as artifacts.
Create Model
- Basic Information: Enter basic information of model.
- Name: Enter model name.
- If model's framework type is PyTorch, you must enter the same model name as PyTorch model name.
- Description: Enter model description.
- Name: Enter model name.
- Framework Information: Enter Framework Information
- Framework: Select the model's framework from either TensorFlow or PyTorch.
- Framework Version: Enter Model framework Version.
- Model Information: Enter the storage where model's artifacts are stored.
- NHN Cloud Object Storage: Enter Object Storage path where model artifact was stored.
- Enter a directory path in form of
obs://{Object Storage API endpoint}/{containerName}/{path}. - If using NHN Cloud Object Storage, please set permissions by referring to Appendix>1. Add AI EasyMaker system account permissions to NHN Cloud Object Storage. If do not set the required permissions, model creation will fail as unable to access to model artifact.
- Enter a directory path in form of
- NHN Cloud NAS: Enter NHN Cloud NAS path where model artifact is stored.
- Enter directory path in form of
nas://{NAS ID}:/{path}
- Enter directory path in form of
- NHN Cloud Object Storage: Enter Object Storage path where model artifact was stored.
- Additional Settings: Enter the additional information of model.
- Tag: To add tag, click the the + button to enter the tag in Key-Value format. You can enter maximum 10 tags.
[Caution] When using NHN Cloud NAS Only NHN Cloud NAS created on the same project as AI EasyMaker is available to use.
[Caution] Retain model artifacts in storage If not retained the model artifacts stored in storage, the creation of endpoints for that model fails.
Model List
Model list is displayed. Selecting a model in the list allows to check detailed information and make changes to it.
- Name: Model name and description are displayed. Model name and description can be changed by clicking Change.
- Tag: Model tag is displayed. Tag can be changed by clicking Change.
- Model Artifact Path displays the storage where the model's artifacts are stored.
- Training Name: For models created from training, training name that is based is displayed.
- Training ID: For models created from training, training ID that is based is displayed.
- Framework: Model's framework information is displayed.
Create Endpoint from Model
Create an endpoint that can serve the selected model.
- Select the model you want to create as an endpoint from the list.
- Click Create Endpoint.
- Get moved to Create Endpoint page. After checking the contents, click Create Endpoint to create a model. For more information on creating models, refer to Endpoint documents.
Delete Model
Delete a model.
- Select the model want to delete from list.
- Click Delete Model.
- Requested deletion task cannot be cancelled. To proceed, please click Confirm
[Note] Unable to delete model if associated endpoint exists You cannot delete model if endpoint created by model want to delete is existed. To delete, delete the endpoint created by the model first and then delete the model.
Endpoint
Create and manage endpoints that can serve the model.
Create Endpoint
- Enable API Gateway Service
- AI EasyMaker endpoints create API endpoints and manage APIs through NHN Cloud API Gateway service. API Gateway service must be enabled to take advantage of endpoint feature.
- For more information on API Gateway services and fees, please refer to the following documents:
- Endpoint: Select whether to add stage to new or existing endpoint.
- Create as New Endpoint: Create new endpoint. Endpoint is created in API Gateway with new service and default stage.
- Add New Stage at Default Endpoint: Endpoint is created as new stage in the service of API Gateway of existing endpoint. Select existing endpoint to add a stage.
- Endpoint name: Enter the endpoint name. Endpoint names cannot be duplicated.
- Stage Name: When adding new stage on existing endpoint, enter name for new stage. Stage names cannot be duplicated.
- Description: Enter the description of endpoint stage.
- Stage Resource Information: Enter the information for model artifacts to deploy to endpoint.
- Model: Select the model you want to deploy to endpoint. If have not created model yet, please create model first.
- API Gateway Resource Path: Enter API resource path for the model being deployed. For example, if set to
/inference, you can request inference API atPOST https://{point-domain}/inference. - Number of Pods: Enter a number of pods in the stage resource.
- Description: Enter a description for the stage resource.
- Instance Information: Enter instance information for the model to be served.
- Instance Flavor: Select instance type.
- Number of Instances: Enter the number of drives for instance.
- Autoscaler: The autoscaler is a feature that automatically adjusts the number of nodes based on resource usage policies. The autoscaler is set on a per-stage basis.
- Enable/Disable: Select whether to enable the autoscaler. If enabled, the number of instances will scale in or out based on the instance load.
- Minimum number of nodes: The minimum number of nodes that can be scaled down
- Maximum number of nodes: The maximum number of nodes that can be scaled up
- Scale-down: Set whether to enable node scale-down
- Resource Usage Threshold: The default for resource usage threshold, which is the reference point for a scale down
- Threshold Duration (min): The resource usage duration at or below the threshold for the nodes to be scaled down
- Scale-up to scale-down latency (min): Delay before starting to monitor for scale-down targets after scaling up
- Additional Settings > Tag: To add a tag, click the + button to enter the tag in Key-Value format. You can enter maximum 10 tags.
[Note] Time to create endpoints Endpoint creation can take several minutes. Creation of the initial resources (notebooks, training, experiments, endpoints) takes additional few minutes to configure the service environment.
[Note] Restrictions on API Gateway service resource provision when creating endpoints When you create a new endpoint, create a new API Gateway service. Adding new stage on existing endpoint creates new stage in API Gateway service. If you exceed the resource provision policy in API Gateway Service Resource Provision Policy, you might not be able to create endpoints in AI EasyMaker. In this case, adjust API Gateway service resource quota.
Endpoint List
Endpoints list is displayed. Select an endpoint in the list to check details and make changes to the information.
- Default Stage URL: Displays URL of default stage among the stages on the endpoint.
-
Status: Status of endpoint. Please refer to the table below for main status.
Status Description CREATE REQUESTED Endpoint creation is requested. CREATE IN PROGRESS Endpoint creation is in progress. UPDATE IN PROGRESS Some of endpoint stages have tasks in progress.
You can check the status of task for each stage in the endpoint stage list.DELETE IN PROGRESS Endpoint deletion is in progress. ACTIVE Endpoint is in normal operation. CREATE FAILED Endpoint creation has failed.
You must delete and recreate the endpoint. If the creation fails repeatedly, please contact the Customer Center.UPDATE FAILED Some of endpoint stages are not serviced properly. You must delete and recreate the stages with issues. -
API Gateway Status: Displays API Gateway status information for default stage of endpoint. Please refer to the table below for main status.
Status Description CREATE IN PROGRESS API Gateway Resource creation in progress. STAGE DEPLOYING API Gateway default stage deploying in progress. ACTIVE API Gateway default stage is successfully deployed and activated. NOT FOUND: STAGE Default stage for endpoint is not found.
Please check if the stage exists in API Gateway console.
If stage is deleted, the deleted API Gateway stage cannot be recovered, and the endpoint have to be deleted and recreated.NOT FOUND: STAGE DEPLOY RESULT The deployment status of the endpoint default stage is not found.
Please check if the default stage is deployed in API Gateway console.STAGE DEPLOY FAIL API Gateway default stage has failed to deploy.
[Note] Please refer to Recovery method when the stage's API Gateway in 'Deployment Failure' status and recover from the deployment failed state.
Create Endpoint Stage
Add new stage to existing endpoint. You can create and test the new stage without affecting default stage.
- In Endpoint list, click Endpoint Name.
- Click + Create Stage.
- Adding new stage from existing endpoint is automatically selected, and its setup method is the same as endpoint creation.
- Requested deletion task cannot be cancelled. If want to proceed, please click Confirm
Endpoint Stage List
Stage list created under endpoint is displayed. Select stage in the list to check more information in the list.
-
Status: Displays status of endpoint stage. Please refer to the table below for main status.
Status Description CREATE REQUESTED Endpoint stage creation requested. CREATE IN PROGRESS Endpoint stage creation is in progress. DEPLOY IN PROGRESS Model deployment to the endpoint stage is in progress. DELETE IN PROGRESS Endpoint stage deletion is in progress. ACTIVE Endpoint stage is normal operation. CREATE FAILED Endpoint stage creation has failed. Please try again. DEPLOY FAILED Deployment to the endpoint stage has failed. Please try again. -
API Gateway Status: Displays stage status of API Gateway from where endpoint stage is deployed.
- Default Stage Check: Displays whether it is a default stage or not.
- Stage URL: Displays Stage URL of API Gateway where the model is served.
- View API Gateway Settings: Click View Settings to see settings that AI EasyMaker has deployed to API Gateway stage.
- View API Gateway Statistics: Click View Statistics to view API statistics of endpoints.
- Instance Flavor: Displays endpoint instance type the model is serving.
- Number of Work Nodes/Pods In Progress: Displays the number of nodes and pods being used by endpoint.
- Stage Resource: Displays information about model artifacts deployed to the stage.
- Monitoring: When you select the endpoint stage, you can see a list of monitored instances and basic metrics charts in the Monitoring tab of the detailed screen that appears.
- The Monitoring tab is disabled while an endpoint stage is being created.
- API Statistics: You can check the API statistics information of the endpoint stage in the API Statistics tab of the details screen that appears when you select the endpoint stage.
- The API Statistics tab is disabled while the endpoint stage is being created.
[Caution] Precautions when changing settings for API Gateway created by AI EasyMaker When creating an endpoint or an endpoint stage, AI EasyMaker creates API Gateway services and stages for the endpoint. Please note the following precautions when changing API Gateway services and stages created by AI EasyMaker directly from API Gateway service console. 1. Avoid deleting API Gateway services and stages created by AI EasyMaker. Deletion may prevent the endpoint from displaying API Gateway information correctly, and changes made to endpoint may not be applied to API Gateway. 2. Avoid changing or deleting resources in API Gateway resource path that was entered when creating endpoints. Deletion may cause the endpoint's inference API call to fail 3. Avoid adding resources in API Gateway resource path that was entered when creating endpoints. The added resources may be deleted when adding or changing endpoint stages. 4. In the stage settings of API Gateway, do not disable Backend Endpoint Url Redifinition or change the URL set in API Gateway resource path. If you change the url, endpoint's inference API call might fail. Other than above precautions, other settings are available with features provided by API Gateway as necessary. For more information about how to use API Gateway, refer to API Gateway Console Guide.
[Note] Recovery method when the stage's API Gateway is in 'Deployment Failed' status If stage settings of AI EasyMaker endpoint are not deployed to the API Gateway stage due to a temporary issue, deployment status is displayed as failed. In this case, you can deploy API Gateway stage manually by clicking Select Stage from the Stage list > View API Gateway Settings > 'Deploy Stage' in the bottom detail screen. If this guide couldn’t recover the deployment status, please contact the Customer Center.
Create Stage Resource
Add a new resource to an existing endpoint stage.
- Model: Select the model you want to deploy to your endpoints. If you have not created a model, please create one first.
- API Gateway Resource Path: Enter the API resource path of the model being deployed. For example, if you set it to
/inference, you can request the inference API withPOST https://{enpdoint-domain}/inference. - Number of Pods: Enter a number of pods in the stage resource.
- Description: Enter a description for the stage resource.
Stage Resource List
A list of resources created under the endpoint stage is displayed.
-
Status : Shows the status of stage resource. Please refer to the table below for the main status.
Status Description CREATE REQUESTED Creating stage resource requested. CREATE IN PROGRESS Stage resource is being created. Training is properly completed. Stage resource is being deleted. ACTIVE Stage resource is deployed normally. CREATE FAILED Creating stage resource failed. Please try again. -
Model Name: The name of the model deployed to the stage.
- API Gateway Resource Path: The endpoint URL of the model deployed to the stage. API clients can request the API at the displayed URL.
- Number of Pods: Shows the number of healthy pods and total pods in use on the resource.
Call Endpoint Inference
- When you click Stage in Endpoint > Endpoint Stage, Stage details screen is displayed at the bottom.
- Check the API Gateway resource path from the details screen on the Stage Resource tab.
- When the API Gateway resource path is called the HTTP POST Method, inference API is called.
- Request and response specifications of the inference API differ depending on the algorithm user created.
// Inference API example: Request
curl --location --request POST '{API Gateway Resource Path}' \
        --header 'Content-Type: application/json' \
        --data-raw '{
    "instances": [
        [6.8,  2.8,  4.8,  1.4],
        [6.0,  3.4,  4.5,  1.6]
        ]
}'

// Inference API Example: Response
{
    "predictions" : [
        [
            0.337502569,
            0.332836747,
            0.329660654
        ],
        [
            0.337530434,
            0.332806051,
            0.329663515
        ]
    ]
}
- Request and response specifications of the inference API differ depending on the algorithm user created.
Delete Stage Resource
- In the endpoint list, click the endpoint name to move it to the Endpoint Stage list.
- In the endpoint stage list, click the endpoint stage on which the stage resource you want to delete is deployed. When you click, the stage details screen will be displayed at the bottom.
- On the Stage Resource tab of the details screen, select the stage resource you want to delete.
- Click Delete Stage Resource.
- Requested deletion cannot be undone. Click OK to proceed.
Change Endpoint Default Stage
Change the default stage of the endpoint to another stage. To change the model of an endpoint without service stop, AI EasyMaker recommends deploying the model using stage capabilities.
- Stages operating as actual services are operated by the default stage.
- If replacing with new model, add new stage to the existing endpoint.
- Verify that the endpoint service is not affected by the replaced model in the new stage.
- Click Change Default Stage.
- Select new stage that want to change as default stage from stage want to change.
- Requested deletion task cannot be cancelled. If want to proceed, please click Confirm
- Stage that you want to change changes to the default stage, and resources of existing default stage are automatically deleted.
Delete Endpoint Stage
- In Endpoint list, click Endpoint Name to go to Endpoint Stage list.
- In Endpoint Stages list, select the endpoint stage want to delete. You cannot delete default stage.
- Click Delete Stage.
- Requested deletion task cannot be cancelled. If want to proceed, please click Confirm
[Caution] Delete stage of API Gateway service when deleting the endpoint stage Deleting an endpoint stage in AI EasyMaker also deletes the stage in API Gateway service from which the endpoint's stage is deployed. If there is an API running on the API Gateway stage to be deleted, please be noted that API calls cannot be made.
Delete Endpoint
Delete an endpoint.
- Select the endpoint want to delete from endpoints list.
- You cannot delete an endpoint if there is stage under endpoint other than the default stage. Please delete the other stages first.
- Click Delete Endpoint.
- Requested deletion task cannot be cancelled. If want to proceed, please click Confirm
[Caution] Delete API Gateway service when deleting the endpoint stage Deleting an endpoint stage in AI EasyMaker also deletes API Gateway service from which the endpoint's stage was deployed. If there is API running on the API Gateway service to be deleted, please be noted that API calls cannot be made.
Batch Inference
Provides an environment to make batch inferences from an AI EasyMaker model and view inference results in statistics.
Create Batch Inference
Set up the environment in which batch inference will be performed by selecting an instance and OS image, and enter the paths to the input/output data to be inferred to proceed with batch inference.
- Basic Information: Enter basic information about a batch inference.
- Batch Inference Name: Enter a name for the batch inference.
- Batch Inference Description: Enter a description.
- Instance information
- Instance Type: Select the instance type to run batch inference on.
- Number of Instances: The number of instances to perform batch inference on.
- Model Information
- Model: Select the model from which you want to make a batch inference. If you did not create a model, create one first.
- Number of Pods: Enter the number of pods in the model.
- Resource Information: You can see the actual resources used by the model. The actual usage is split and allocated to each pod based on the number of pods you entered.
- Input Data
- Data Path: Enter the path to the data that you want to run batch inference on.
- Enter the NHN Cloud Object Storage or NHN Cloud NAS path.
- Input Data Type: Select the type of data you want to run batch inference on.
- JSON: Use valid JSON data from a file as input.
- JSONL: Use JSON lines files where each line is valid JSON as input.
- Note: https://jsonlines.org/
- Glob Pattern
- Specify File to Include: Enter a set of files to include in the input data in a Glob pattern.
- Specify File to Exclude: Enter a set of files to exclude from the input data in a Glob pattern.
- Data Path: Enter the path to the data that you want to run batch inference on.
- Output Data
- Output Data: Enter the data storage path to save the batch inference results.
- Enter the NHN Cloud Object Storage or NHN Cloud NAS path.
- Output Data: Enter the data storage path to save the batch inference results.
- Additional Settings
- Batch Options
- Batch Size: Enter the number of data samples that are processed simultaneously in one inference job.
- Inference Timeout (in seconds): Enter the timeout period for batch inference. You can set the maximum allowable time before a single inference request is processed and results are returned.
- Data Storage Size : Enter the data storage size of the instance to run batch inference.
- Used only when using NHN Cloud Object Storage. Please specify a size large enough to store all the data required for batch inference.
- Maximum Batch Inference Time : Specify the maximum waiting time until batch inference is complete. Batch inference that exceeds the maximum waiting time will be terminated.
- Log Management : Logs generated during batch inference can be stored in the NHN Cloud Log & Crash Search service.
- For more information, please refer to Appendix > 2. NHN Cloud Log & Crash Search Service User Guide and Log Check.
- Tag : To add a tag, click the + button and enter the tag in Key-Value format. You can enter up to 10 tags.
- Batch Options
[Caution] When using NHN Cloud NAS Only NHN Cloud NAS created on the same project as AI EasyMaker is available to use.
[Caution] Batch inference fails when batch inference input data is deleted Batch inference can fail if you delete input data before batch inference is complete.
[Caution] When setting input data detailed options If the Glob pattern is not entered properly, batch inference may not work properly because the input data cannot be found. When used together with the Include Glob pattern, the Exclude Glob pattern takes precedence.
[Caution] When setting batch options You must set the batch size and inference timeout appropriately based on the performance of the model you are batch inferring. If the settings you enter are incorrect, batch inference might not perform well enough.
Batch Inference List
Displays a list of batch inferences. Select a batch inference from the list to check the details and change the information.
- Inference Time: Displays how long the batch inference has been running.
-
Status : Displays the status of batch inference. Please refer to the table below for the main status.
Failed Training : Indicates the number of failed lessons. Best Training: Indicates the target metric information of the training that recorded the highest target metric value among the training automatically generated by hyperparameter tuning. Status : Shows the status of hyperparameter tuning. Please refer to the table below for the main status. You have requested to create a batch inference. API Gateway Status: Displays API Gateway status information for default stage of endpoint. Please refer to the table below for main status. This is a state in which resources necessary for batch inference are being created. Description Batch inference is in progress. Resources required for hyperparameter tuning are being created. Batch inference is stopped at the user's request. COMPLETE Batch inference has been completed successfully. STOP IN PROGRESS Batch inference is stopping. FAIL BATCH INFERENCE This is a failed state during batch inference. Detailed failure information can be checked through the Log & Crash Search log when log management is enabled. Stage resource is being deleted. The batch inference creation failed. If creation continues to fail, please contact customer service. FAIL BATCH INFERENCE IN PROGRESS, COMPLETE IN PROGRESS The resources used for batch inference are being cleaned up. * Operation * Stop: You can stop batch inference in progress. * Monitoring: When you select a batch inference, you can check the list of monitored instances and basic indicator charts in the Monitoring tab of the detailed screen that appears. * The Monitoring tab is disabled while batch inference is being created.
Copy Batch Inference
Create a new batch inference with the same settings as an existing batch inference.
- Select the batch inference you want to copy.
- Click Copy Batch Inference.
- The Create batch inference screen appears with the same settings as an existing batch inference.
- If there is any information you would like to change the settings for, make the changes and then click Create Batch Inference to create the batch inference.
Delete Batch Inference
Delete a batch inference.
- Select the batch inference you want to delete.
- Click Delete Batch Inference. Batch inference in progress can be deleted after stopping.
- Requested deletion task cannot be cancelled. To proceed, please click Confirm
Private Image
User-personalized container images can be used to drive notebooks, training, and hyperparameter tuning. Only private images derived from the notebook/deep learning images provided by AI EasyMaker can be used when creating resources in AI EasyMaker. See the table below for the base images in AI EasyMaker.
Notebook Image
| Image Name | CoreType | Framework | Framework version | Python version | Image address |
|---|---|---|---|---|---|
| Ubuntu 22.04 CPU Python Notebook | CPU | Python | 3.10.12 | 3.10 | fb34a0a4-kr1-registry.container.nhncloud.com/easymaker/python-notebook:3.10.12-cpu-py310-ubuntu2204 |
| Ubuntu 22.04 GPU Python Notebook | GPU | Python | 3.10.12 | 3.10 | fb34a0a4-kr1-registry.container.nhncloud.com/easymaker/python-notebook:3.10.12-gpu-py310-ubuntu2204 |
| Ubuntu 22.04 CPU PyTorch Notebook | CPU | PyTorch | 2.0.1 | 3.10 | fb34a0a4-kr1-registry.container.nhncloud.com/easymaker/pytorch-notebook:2.0.1-cpu-py310-ubuntu2204 |
| Ubuntu 22.04 GPU PyTorch Notebook | GPU | PyTorch | 2.0.1 | 3.10 | fb34a0a4-kr1-registry.container.nhncloud.com/easymaker/pytorch-notebook:2.0.1-gpu-py310-ubuntu2204 |
| Ubuntu 22.04 CPU TensorFlow Notebook | CPU | TensorFlow | 2.12.0 | 3.10 | fb34a0a4-kr1-registry.container.nhncloud.com/easymaker/tensorflow-notebook:2.12.0-cpu-py310-ubuntu2204 |
| Ubuntu 22.04 GPU TensorFlow Notebook | GPU | TensorFlow | 2.12.0 | 3.10 | fb34a0a4-en1-registry.container.nhncloud.com/easymaker/tensorflow-notebook:2.12.0-gpu-py310-ubuntu2204 |
Deep Learning Images
| Image Name | CoreType | Framework | Framework version | Python version | Image address |
|---|---|---|---|---|---|
| Ubuntu 22.04 CPU PyTorch Training | CPU | PyTorch | 2.0.1 | 3.10 | fb34a0a4-kr1-registry.container.nhncloud.com/easymaker/pytorch-train:2.0.1-cpu-py310-ubuntu2204 |
| Ubuntu 22.04 GPU PyTorch Training | GPU | PyTorch | 2.0.1 | 3.10 | fb34a0a4-en1-registry.container.nhncloud.com/easymaker/pytorch-train:2.0.1-gpu-py310-ubuntu2204 |
| Ubuntu 22.04 CPU TensorFlow Training | CPU | TensorFlow | 2.12.0 | 3.10 | fb34a0a4-kr1-registry.container.nhncloud.com/easymaker/tensorflow-train:2.12.0-cpu-py310-ubuntu2204 |
| Ubuntu 22.04 GPU TensorFlow Training | GPU | TensorFlow | 2.12.0 | 3.10 | fb34a0a4-kr1-registry.container.nhncloud.com/easymaker/tensorflow-train:2.12.0-gpu-py310-ubuntu2204 |
[Note] Limitations on using private images * Only private images derived from base images provided by AI EasyMaker can be used. * Only NHN Container Registry (NCR) can be integrated as a container registry service where private images are stored. (As of December 2023)
Create Private Image
The following document explains how to create a container image with an AI EasyMaker-based image using Docker, and using a private image for notebooks in AI EasyMaker.
-
Create a DockerFile of private image.
FROM fb34a0a4-kr1-registry.container.nhncloud.com/easymaker/python-notebook:3.10.12-cpu-py310-ubuntu2204 as easymaker-notebook RUN conda create -n example python=3.10 RUN conda activate example RUN pip install torch torchvision -
Build a private image and push to the container registry Build an image with a Dockerfile and save (push) the image to the NCR registry.
docker build -t {image name}:{tags} . . docker tag {image name}:{tag} docker push {NCR registry address}/{image name}:{tag} docker push {NCR registry address}/{image name}:{tag} . (Example) docker build -t custom-training:v1 . docker tag custom-training:v1 example-kr1-registry.container.nhncloud.com/registry/custom-training:v1 docker push example-kr1-registry.container.nhncloud.com/registry/custom-training:v1 -
Create a private image in AI EasyMaker of the image you saved (pushed) to the NCR.
- Go to the Image menu in the AI EasyMaker console.
- Click the Create image button to enter the information for the image you created.
- Name, description: Enter a name and description for the image.
- Address: Enter the address of the registry image.
- Type: Enter the type of container image. Select Notebook or Training.
- Account: Select the account for the AI EasyMaker notebook/learning node to access your registry storage.
- New: Register a new registry account.
- Name, Description: Enter a name and description for the registry account.
- Category: Select a container registry service.
- ID: Enter the ID of the registry storage.
- Password: Enter the password for the registry storage.
- Use an existing account: Select a registry account that is already registered.
- New: Register a new registry account.
-
Create a notebook with the private image you created.
- Go to the Notebook menu. Click the Create notebook button to go to the Create notebook page.
- Under Image information, click the Private Image tab.
- Select a private image to use as the notebook container image.
- After filling out and creating the other notebook information, the notebook will be running with your private image.
[Note] You can create resources using your private image in the same way for non-notebook training and hyperparameter tuning.
[Note] Container registry service: NHN Container Registry (NCR) Only NCR service can be used as a container registry service. (As of December 2023)
Enter the following values for the account ID and password for the NCR service.
ID: User Access Key of NHN Cloud user account
Password: User Secret Key of NHN Cloud user account
Registry Account
In order for AI EasyMaker to pull an image from a user's registry where private images are stored to power the container, they need to be logged into the user's registry. If you save your login information with a registry account, you can reuse it in images linked to that registry account. To manage your registry accounts, go to the Image menu in the AI EasyMaker console, then select the Registry Account tab.
Create Registry Account
Create a new registry account.
- Name: Enter the name of registry account.
- Description: Enter a description of the registry account.
- Category: Select a container registry service.
- ID: Enter the ID of the registry account.
- Password: Enter the password for the registry account.
Modify Registry Account
Modify registry ID and password
- Click Change Registry Account.
- Enter an ID and password, then click Confirm.
[Note] When you change your registry account, you sign in to the registry service with the changed username and password when using images associated with that account. If you enter an incorrect registry username and password, the login during a private image pull fails and the resource creation fails. If there are resources being created with a private image that has a registry account associated with it, or if there are studies and hyperparameters in progress, you cannot modify them.
Registry Account > Change Name, Description
- In the Registry Accounts list, select the account you want to change.
- Click Change on the bottom screen.
- After changing the name and description, click the Confirm button.
Delete Registry Account
Select the registry account you want to delete from the list, and click Delete Registry Account.
[Note] You cannot delete a registry account associated with an image. To delete, delete the associated image first and then delete the registry account.
Appendix
1. Add AI EasyMaker system account permissions to NHN Cloud Object Storage
Some features of AI EasyMaker use the user's NHN Cloud Object Storage as input/output storage You must allow read or write access to user’s AI EasyMaker system account in NHN Cloud Object Storage container for running normal features.
Allowing read/write permissions on the AI EasyMaker system account to the user's NHN Cloud Object Storage container is meaning that AI EasyMaker system account can read or write files in accordance with permissions granted to all files in the user's NHN Cloud Object Storage container.
You have to check this information to set up an access policy in User Object Storage only with the required accounts and permissions.
The 'User' take responsibility for all consequences of allowing the user to access Object Storage for an account other than the AI EasyMaker system account during the access policy setting process, and AI EasyMaker is not responsible for it.
[Note] According to features, AI EasyMaker accesses, reads or writes to Object Storage as follows.
| Feature | Access Right | Access target |
|---|---|---|
| Training | Read | Algorithm path entered by user, training input data path |
| Training | Write | User-entered training output data, checkpoint path |
| Model | Read | Model artifact path entered by user |
| Endpoint | Read | Model artifact path entered by user |
To add read/write permissions to AI EasyMaker system account in Object Storage, refer to the following:
- Click [Training] or [Model] Tab>AI EasyMaker System Account Information.
- Archive the AI EasyMaker system account information, AI EasyMaker Tenant ID and AI EasyMaker API User ID.
- Go to the NHN Cloud Object Storage console.
- Allow specific projects or users to read/write Refer to documents to add required read and write permissions to AI EasyMaker system account in NHN Cloud Object Storage console.
2. NHN Cloud Log & Crash Search Service Usage Guide and Log Inquiry Guide
NHN Cloud Log & Crash Search Service Usage Guide
Logs and events generated by the AI EasyMaker service can be stored in the NHN Cloud Log & Crash Search service. To store logs in the Log & Crash Search service, you have to enable Log & Crash service and separate usage fee will be charged.
- Information on Log & Crash Search service use and fee
- For more information and fees on the Log & Crash Search service, please refer to the following documents
Log Query
- Go to the Log & Crash Search service console page.
- In Log & Crash Search service, enter search criteria to view the logs.
- AI EasyMaker Training Log Query: Query logs with category field "easymaker.training"
- Question: category:"easymaker.training"
- AI EasyMaker endpoint logs query: Query logs with category field "easymaker.inference"
- Question: category:"easymaker.inference"
- AI EasyMaker Log Full Query: Query logs with logType field "NNHCloud-AIEasyMaker"
- Question: logType:"NHNCloud-AIEasyMaker"
- AI EasyMaker Training Log Query: Query logs with category field "easymaker.training"
- For more information on how to use Log & Crash Search service, refer to Log & Crash Search Service Console Guide.
AI EasyMaker service sends logs to Log & Crash Search service in the following defined fields:
-
Common Log Field
Name Description Valid range easymakerAppKey AI EasyMaker Appkey(AppKey) - category Log category easymaker.training, easymaker.inference logLevel Log level INFO, WARNING, ERROR body Log contents - logType Service name provided by log NHNCloud-AIEasyMaker time Log Occurrence Time (UTC Time) - -
Training Log Field
Name Description trainingId AI EasyMaker training ID -
Hyperparameter Tuning Log Field
Name Description hyperparameterTuningId AI EasyMaker hyperparameter tuning ID -
Endpoint Log Field
Name Description endpointId AI EasyMaker Endpoint ID endpointStageId Endpoint stage ID inferenceId Inference request own ID action Action classification (Endpoint.Model) modelName Model name to be inferred -
Batch Inference Log Field
Name Description batchInferenceId AI EasyMaker batch inference ID
3. Hyperparameters
- Value in Key-Value format entered through the console.
- When entry point is executed, it is passed to the execution factor (---{Key}).
- It can be stored and used as an environment variable (EM_HP_{Key converted to uppercase letter}).
As shown in the example below, you can use hyperparameter values entered during training creation.
    import argparse

    model_version = os.environ.get("EM_HP_MODEL_VERSION")

    def parse_hyperparameters():
        parser = argparse.ArgumentParser()

        # Parsing the entered hyper parameter
        parser.add_argument("--epochs", type=int, default=500)
        parser.add_argument("--batch_size", type=int, default=32)
        ...

        return parser.parse_known_args()
4. Environment Variables
- Information required for training is passed to training container with Environment Variable and the environment variables passed in Training Script can be utilized.
- Environment variable names created by user input are to be capitalized.
- Models that have been trained in the code must be saved in the EM_MODEL_DIR path.
-
Key Environment Variables
Environment variable name Description EM_SOURCE_DIR Absolute path to the folder where the algorithm script entered at the time of training creation is downloaded EM_ENTRY_POINT Algorithm entry point name entered at training creation EM_DATASET_${Data set name} Absolute path to the folder where each data set entered at the time of training creation is downloaded EM_DATASETS Full data set list ( json format) EM_MODEL_DIR Model storage path EM_CHECKPOINT_INPUT_DIR Input checkout storage path EM_CHECKPOINT_DIR Checkpoint Storage Path EM_HP_${ Upper case converted Hyperparameter key } Hyperparameter value corresponding to the hyperparameter key EM_HPS Full Hyperparameter List (in json format) EM_TENSORBOARD_LOG_DIR TensorBoard log path for checking training results EM_REGION Current Region Information EM_APPKEY Appkey of AI EasyMaker service currently in use -
Example code for utilizing environment variables
import os
import tensorflow

dataset_dir = os.environ.get("EM_DATASET_TRAIN")
train_data = read_data(dataset_dir, "train.csv")

model = ... # Implement the model using input data
model.load_weights(os.environ.get('EM_CHECKPOINT_INPUT_DIR', None))
callbacks = [
    tensorflow.keras.callbacks.ModelCheckpoint(filepath=f'{os.environ.get("EM_CHECKPOINT_DIR")}/cp-{{epoch:04d}}.ckpt', save_freq='epoch', period=50),
    tensorflow.keras.callbacks.TensorBoard(log_dir=f'{os.environ.get("EM_TENSORBOARD_LOG_DIR")}'),
]
model.fit(..., callbacks)

model_dir = os.environ.get("EM_MODEL_DIR")
model.save(model_dir)
5. Store Indicator Logs for TensorBoard Usage
-
In order to check result indicators on the TensorBoard screen after training, the TensorBoard log storage space must be set to the specified location (
EM_TENSORBOARD_LOG_DIR) when writing the training script. -
Example code for Tesnsorboard log storage (TensorFlow)
import tensorflow as tf

# Specify the TensorBoard log path
tb_log = tf.keras.callbacks.TensorBoard(log_dir=os.environ.get("EM_TENSORBOARD_LOG_DIR"))

model = ... # model implementation

model.fit(x_train, y_train, validation_data=(x_test, y_test),
        epochs=100, batch_size=20, callbacks=[tb_log])
6. Distributed Training Settings by Framework
- Tensorflow
- The environment variable
TF_CONFIGrequired for distributed training is automatically set. For more information, please refer to the Tensorflow guide document.
- The environment variable
- Pytorch
Backendssettings are required for distributed training. If distributed training is performed on CPU, set it to gloo, and if distributed training is performed on GPU, set it to nccl. For more information, please refer to the Pytorch guide document.
7. Upgrade the cluster version
The AI EasyMaker service periodically upgrades the cluster version to provide stable service and new features. When a new cluster version is deployed, you need to move the notebooks and endpoints that are running on the old version of the cluster to the new cluster. Explains how to move new clusters by resource.
Upgrade Notebook Cluster Version
On the Notebook list screen, notebooks that need to be moved to the new cluster display a Restart button to the left of their name. Hovering the mouse pointer over theRestart button displays restart instructions and an expiration date.
- Before expiration, be sure to read the following caveats before clicking the Restart button.
- Upon restart, data stored in the data storage (/root/easymaker directory path) will remain intact.
- When you run a restart, data stored in boot storage is initialized and may be lost. Move your data to data storage before restarting.
Restarts take about 25 minutes for the first run, and about 10 minutes for subsequent runs. Failed restarts are automatically reported to the administrator.
Upgrade the endpoint cluster version
On the endpoints list screen, endpoints that need to be moved to the new cluster will have a ! Notice to the left of the name. If you hover over the ! Notice, it displays a version upgrade announcement and an expiration date. Before the expiration, you must follow these instructions to move stages running on the old version cluster to the new version cluster.
Upgrade the cluster version of a general stage
- Delete a general stage that is not the default stage. Make sure the stage is in service before deleting.
- Recreate the stage.
- When a new stage becomes ACTIVE, check whether API calls and inference responses come normally to the stage endpoint.
[Caution] Deleting a stage will shut down the endpoint, preventing API calls. Ensure that the stage is not in service before deleting it.
Upgrade the cluster version of the default stage
The default stage is the stage on which the actual service operates. To move the cluster version of the default stage without disrupting the service, use the following guide to move it.
- Create a new stage to replace the default stage in an older version of the cluster.
- Verify that API calls and inference responses are coming from the new stage endpoint as normal.
- Click Change Default Stage. Select a new stage to change it to the default stage.
- When the change is complete, the new stage is set as the default stage, and the existing default stage is deleted.
8. How to Use Torchrun
- The code has been written to enable distributed learning in Pytorch, and if you enter the number of distributed nodes and the number of processes per node, distributed learning using torchrun and distributed learning using multi-processes will be performed.
- Training and hyperparameter tuning can fail due to insufficient memory, depending on factors such as the total number of processes, model size, input data size, batch size, etc. If it fails due to insufficient memory, it may leave the following error messages. However, not all of the messages below are due to insufficient memory. Please set the appropriate instance type according to your memory usage.
exit code : -9 (pid: {pid})
- For more information about torchrun, see the Pytorch Guide.
Table of Contents
- Machine Learning > AI EasyMaker > Console Guide
- Dashboard
- Service Usage
- Monitoring Services
- Resource Utilization
- Notebook
- Create Notebook
- Notebook List
- Configure User Virtual Execution Environment
- Stop Notebook
- Change Notebook Instance Flavor
- Delete Notebook
- Experiment
- Create Experiment
- List of Experiments
- Delete Experiment
- Training
- Create Training
- Training List
- Copy Training
- Create a Model from Training
- Delete Training
- Hyperparameter Tuning
- Create Hyperparameter Tuning
- Hyperparameter Tuning List
- List of Trainings for Hyperparameter Tuning
- Copy Hyperparameter Tuning
- Create a Model from Hyperparameter Tuning
- Delete Hyperparameter Tuning
- Training Template
- Create Training Template
- List of Training Templates
- Copy Training Template
- Delete Training Template
- Model
- Create Model
- Model List
- Create Endpoint from Model
- Delete Model
- Endpoint
- Create Endpoint
- Endpoint List
- Create Endpoint Stage
- Endpoint Stage List
- Create Stage Resource
- Stage Resource List
- Call Endpoint Inference
- Delete Stage Resource
- Change Endpoint Default Stage
- Delete Endpoint Stage
- Delete Endpoint
- Batch Inference
- Create Batch Inference
- Batch Inference List
- Copy Batch Inference
- Delete Batch Inference
- Private Image
- Notebook Image
- Deep Learning Images
- Create Private Image
- Registry Account
- Create Registry Account
- Modify Registry Account
- Delete Registry Account
- Appendix
- 1. Add AI EasyMaker system account permissions to NHN Cloud Object Storage
- 2. NHN Cloud Log & Crash Search Service Usage Guide and Log Inquiry Guide
- 3. Hyperparameters
- 4. Environment Variables
- 5. Store Indicator Logs for TensorBoard Usage
- 6. Distributed Training Settings by Framework
- 7. Upgrade the cluster version
- 8. How to Use Torchrun